Why Start a Podcast?
Did you know that there are now over 67 million people that tune into their favourite podcasts on a monthly basis? According to Edison Research the average listener tunes into 1 to 3 hour shows. That’s around 5 hours people listen to on a weekly basis, so there’s never been a better time to start a podcast.
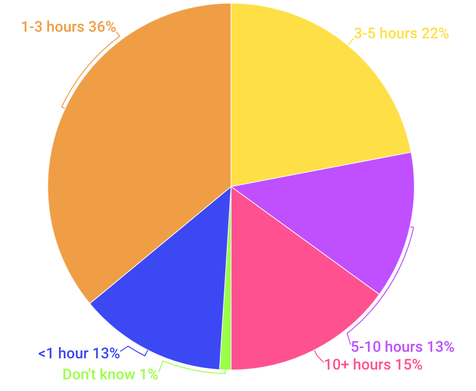
Podcasting is huge. It’s only been around since the early 2000’s, but podcasts have become so commonplace that 169 million people are now familiar with the word “podcasting”, so now's a good time to start a podcast and engage with your listeners.
Compared to other content platforms like blogging, podcasts allow you to create an intimate connection with your listener. Imagine talking to a friend for 30 minutes. They hear what you have to say and are drawn into the conversation, which is something that blog posts can’t really do.
People are more likely to listen to ads when fully engaged. According to Midoll, 63% of their listeners purchased a product or service after hearing it advertised on a podcast. Whether you’re looking to start a podcast to promote your business or you’re try to make some money from your shows, podcasting is a great place to be.
Getting Started
Do you know what your podcast will be about? For some people it’s obvious. For example, if you help run a restaurant then your podcast should be about different foods from around the world.
Topics you choose will come down to either what you know or what you’re passionate about. If you’re not sure what each episode should be about then brainstorm some ideas. For your first 5 episodes try these:
- Welcome: What your podcast is about and who you are.
- Tools: 5 tools, services, or resources you use.
- Mistakes: 10 common mistakes you see and how to avoid them.
- Reaction: Your reaction to an event or new product.
- Future: The future of your industry and where you see it heading.
Plan out around 10 episodes in total to start with. This way you have a plan to follow which makes it easier when it comes time to sit down and actually record your shows. If you need inspiration for future shows then look to similar podcasts on iTunes or TuneIn that are popular. They can tell you what works and what doesn’t with their number of reviews, followers, and episode popularity.
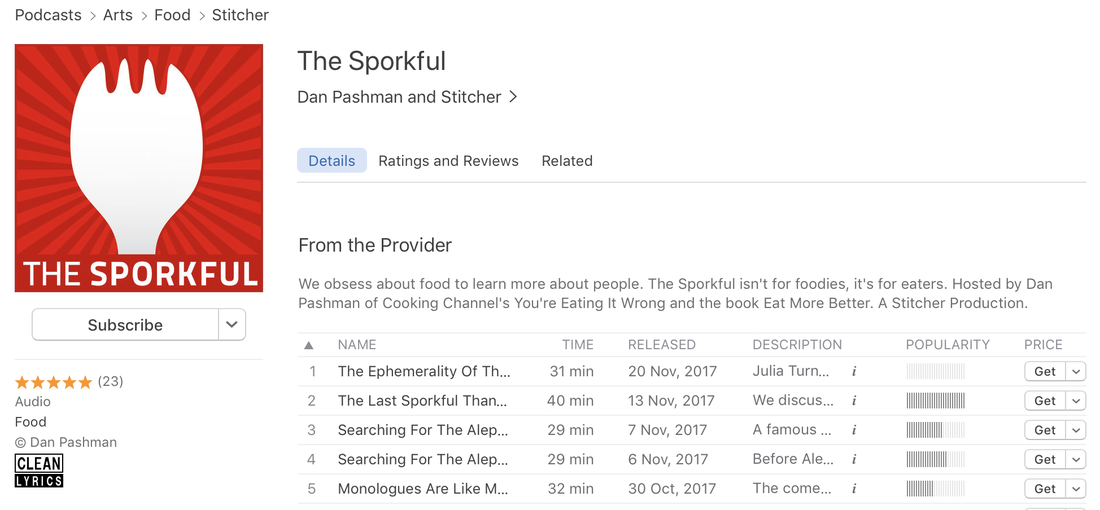
The next important part of your podcast is your show's format. What will go into each episode and how will content will be structured? Here are a few ideas:
- Interviews.
- Solo / Personal Thoughts.
- Co-hosting.
- Storytelling.
- Combination of the above.
Lastly, how long will your episodes be? Try and be consistent by setting a length for each episode. For example, if your podcast is 30 minutes, stick with that length. This way listeners know what to expect and can plan ahead. If they have a daily commute then they can fit it all in during their journey.
Defining Your Podcast
It’s easy to assume that podcasts are easy to make because they’re just audio, but that’s not the case. You need to define your podcast in order to attract an audience. That’s things like name, description, and artwork. The better you define your podcast, the higher the chances of getting found online by new listeners.
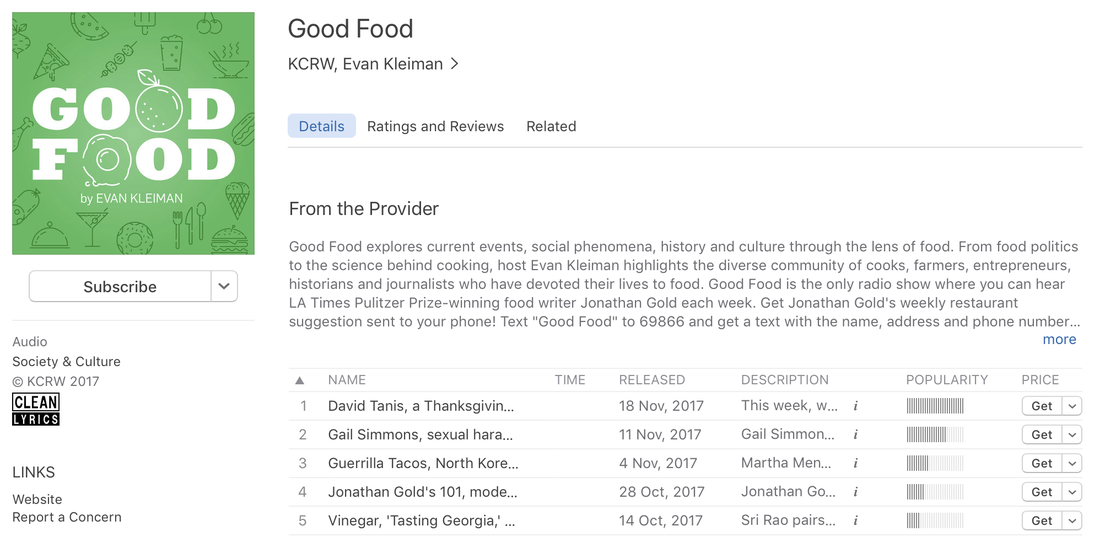
- Name: Your podcast’s name defines your shows. People should know what your podcast is about just by name alone. Take Good Food for example. It’s obvious the show’s about food, but it also helps with search-ability. People searching for “food” will bring this show up, so properly naming your podcast is essential to getting food by new listeners.
- Description: Showcase what your podcast has to offer listeners. Include as many keywords and phrases that best describe your shows. This helps with search-ability in places like iTunes and SoundCloud. For example, iTunes is the biggest podcast directory and acts as a search engine for people to find the podcasts they want to check out, including yours!
- Artwork: As it’s the first thing listeners see your podcast artwork needs to be eye catching. Use appealing colours and clear images that are easy to see even when reduced in size. If you’re not sure what yours should include then check out popular podcasts on iTunes to see how they do it. Use a service like Fiverr to create your cover artwork. It needs be a minimum of 1400x1400 and maximum 2048x2048 in size and in JPEG or PNG file format.
- Category / Subcategory: There are plenty of categories and subcategories to define your podcast on places like iTunes. There’s health, tv and film, education, and more. Choose a category that best fits your podcast’s topics. If you’re not sure what your podcast falls under, then look to similar shows for what they use.
- Age Rating: Will your shows be for everybody or more of an adult audience? Your rating is important as it could mean losing out on potential listeners due to age restrictions. If your shows don’t cover adult themes and have no explicit content then they’re “clean”, so anybody can download and enjoy your podcasts.
Podcasting Equipment You'll Need
The good news is the only essential piece of podcasting equipment you’ll need is a microphone. The bad news is there are literally thousands of options to choose from. So which is the right one for you?Condenser microphones like the Warm Audio WA87 record better audio, but need to go through a mixer or audio interface for power. On the other hand, dynamic microphones often have a USB connector so they’re easier to setup and start using. Here are a few mic options we recommend:
- Fifine 669: The most affordable USB mic on this list. The Fifine is around $25 and offers good entry level audio for what you expect from it’s low price point.
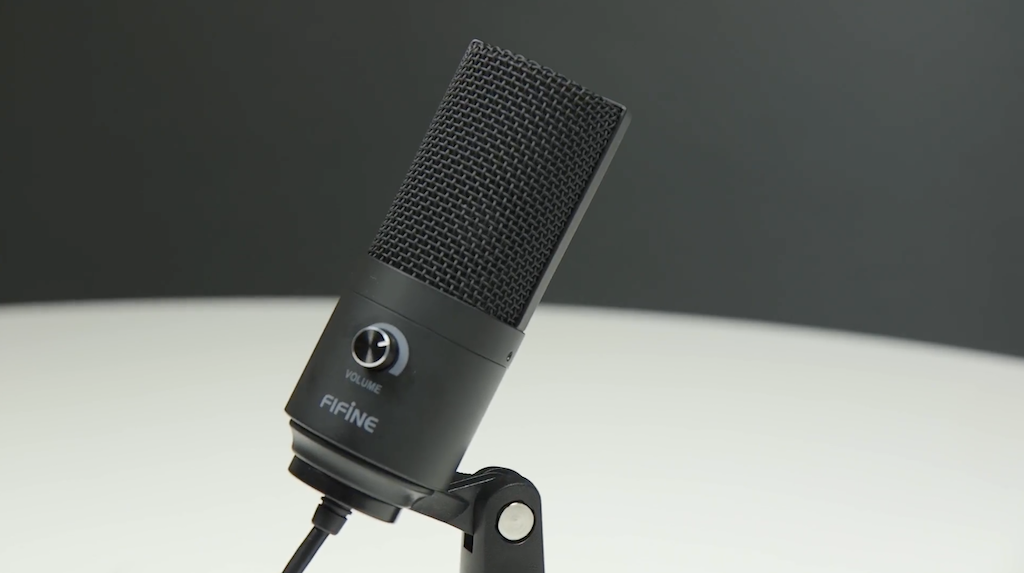
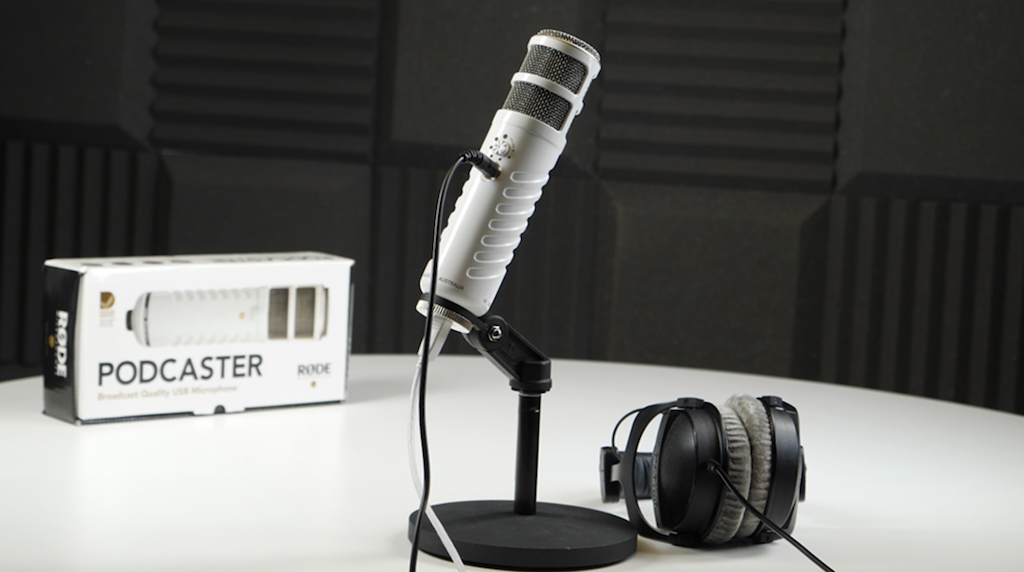
- Rode Podcaster: For $220, this is a superb dynamic microphone designed specifically for podcasters (hence the name!). In terms of quality for a USB mic, you can’t get much better than this.
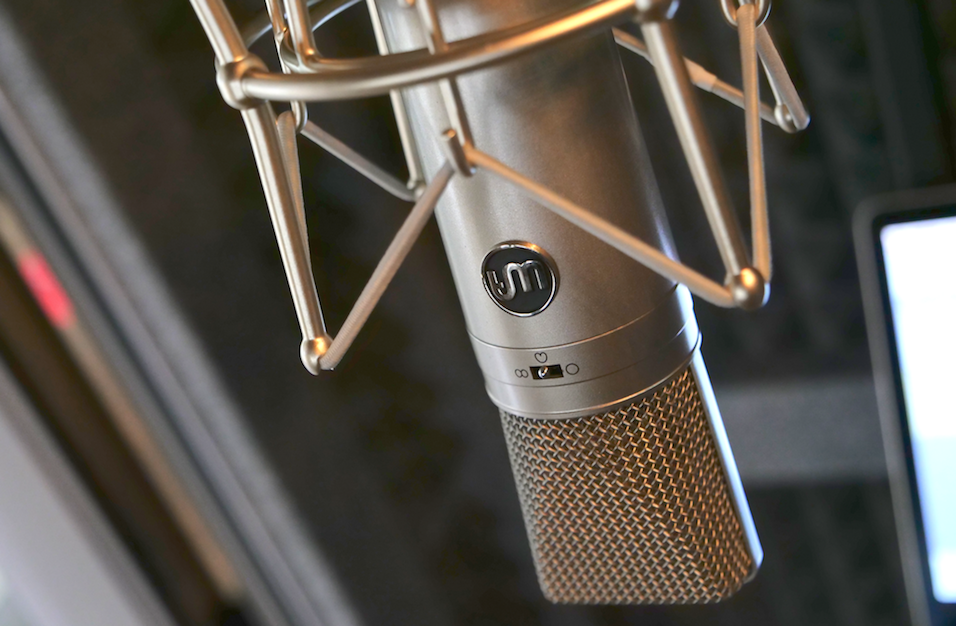
- Warm Audio WA87: The WA87 is a replica of the popular U87 mics you often find in professional radio studios and production environments. The only difference is this is half the cost, going for around $600.
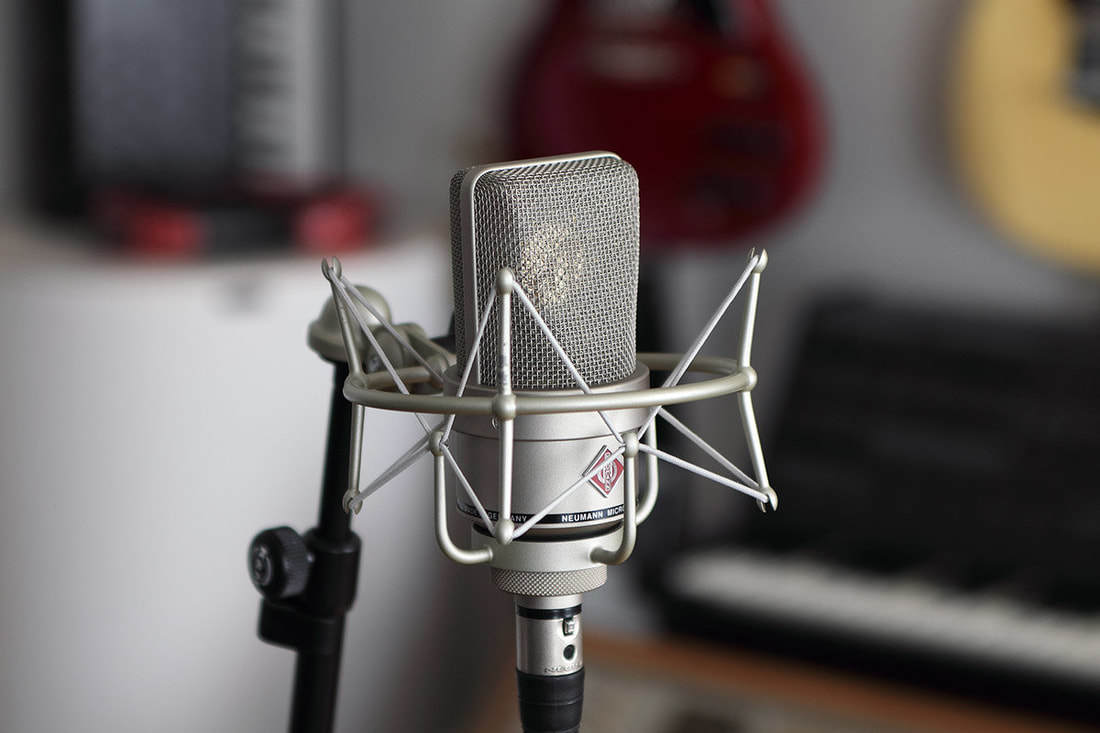
- Neumann TLM 103: The TLM 103 is one of the best condenser microphones out there. It’s widely used in commercial studios and by professional broadcasters like Howard Stern. High-end mics like this aren’t cheap. The TLM 103 is around $1,100, but it’s money well spent.
Extras (Not Essential, but They Help)
You might be thinking that these microphones are pretty expensive, and you’re not wrong. However, decent equipment will last forever if you take good care of it. It might seem expensive to start a podcast, but after the initial purchase, you don’t need much else. To make the most out of your audio we recommend checking out these options:
- Pop Shield: Acting as a safeguard, a pop shield or filter protects loud and unwanted noises from being picked up. Attach a shield to the end of your mic so recordings sound natural without picking up popping noises.
- Boom Arm: A standing desk mount can be position your microphone to where you want it to be, but lacks manoeuvrability. Boom arms, like the RODE PSA1, make it easier to move your mic. Definitely invest in one if you plan to go from sitting to standing during your shows.
- Acoustic Panels: Home environments can often be noisy, but you can fix this by using acoustic foam panels. Dampening sounds from bouncing around the room, foam panels muffle loud noises. A dozen or so of these can really make a difference.
The better your setup, the clearer your audio will be for more professional sounding podcasts.
Recording Your First Podcast
The best thing about podcasting is actually sitting down and recording your shows. In order to do that you need the right audio production program to record, edit, and mix your episodes together. Here are a few we recommend:
- Audacity: Free, simple, and easy to use from the get go. Audacity is probably the best well rounded audio program for newcomers to record and edit shows on Windows, Mac, and Linux systems.
- GarageBand: Exclusively for Mac computers, GarageBand is good enough for most of your audio recording and editing needs.
- Reaper: Is a fully customisable audio production program for $60. It can scare people away with it’s endless open-source plugins, but this is what makes it unique. For professional studio setups looking to customise their audio rig, this is worth investing in.
- Adobe Audition: If you want really powerful audio editing software with plenty of features to play with, then Adobe Audition has you covered. For $20/m, it may seem awfully pricey, but if you’re using high-end equipment it might be a good idea to invest in high-end audio software.
For first time podcasters the last two options can be a bit overwhelming and somewhat pricey. That’s why we’re going to show you how to use Audacity to record your first podcast.
Download Audacity. Once installed it should look something like this:
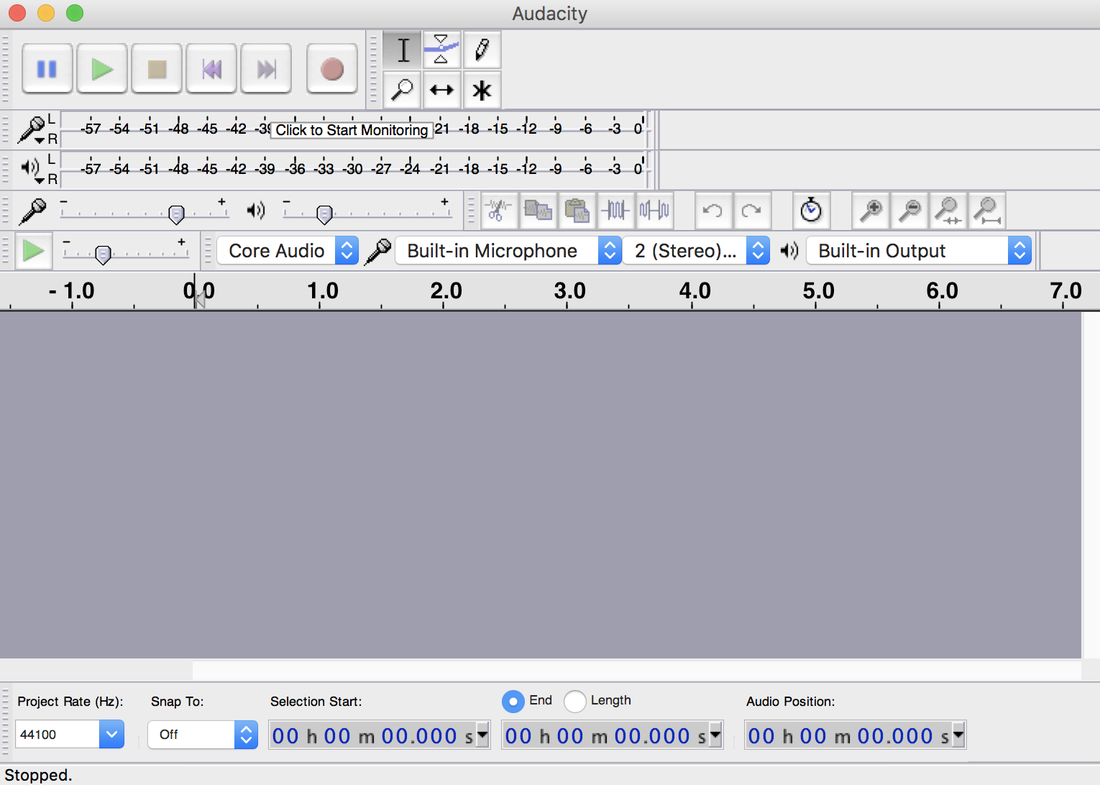
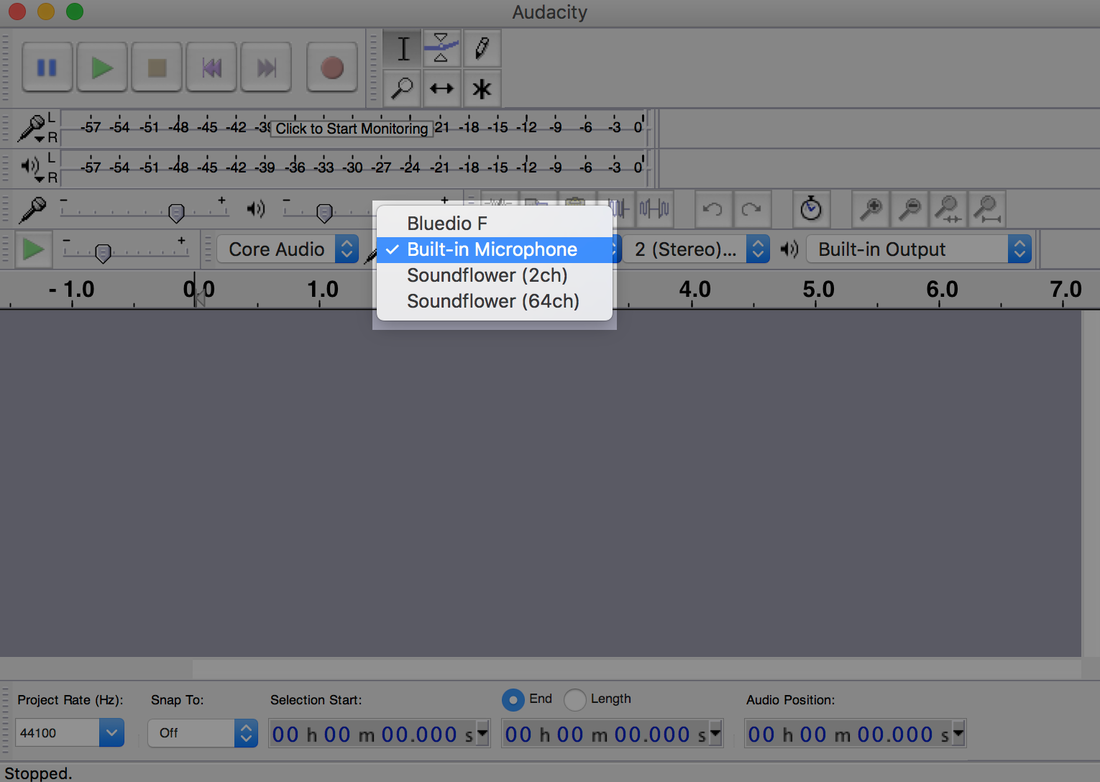
Choose the microphone you want to use from the drop-down menu. If you’ve yet to get an external mic then use what’s on hand like your computer’s built-in mic.
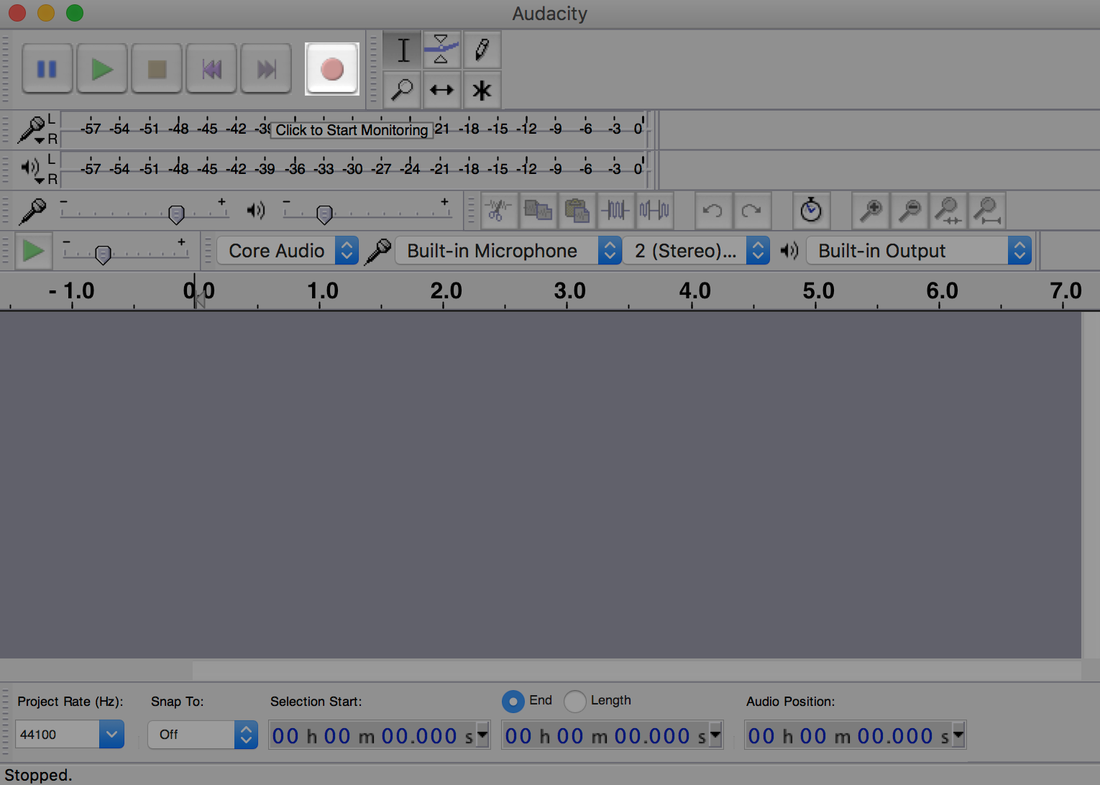
Once you’re ready to go hit the big red button to start recording your show.
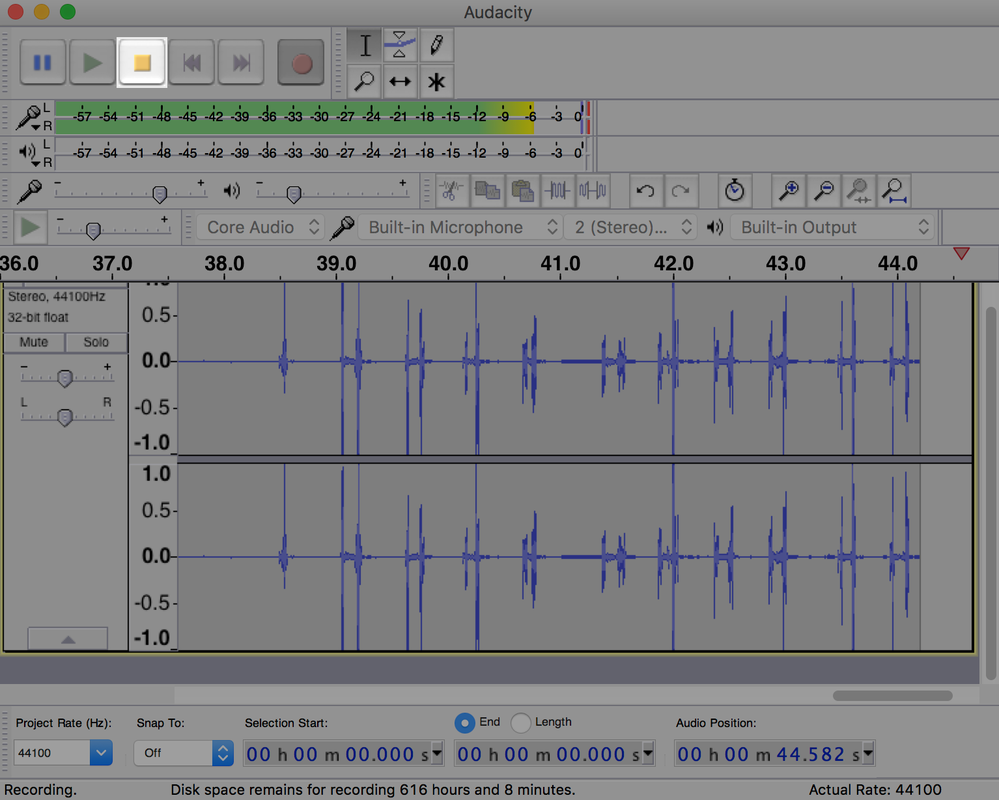
You can pause the recording at any time by pressing the pause button, then again to continue. Once you’re finished, click the stop button.
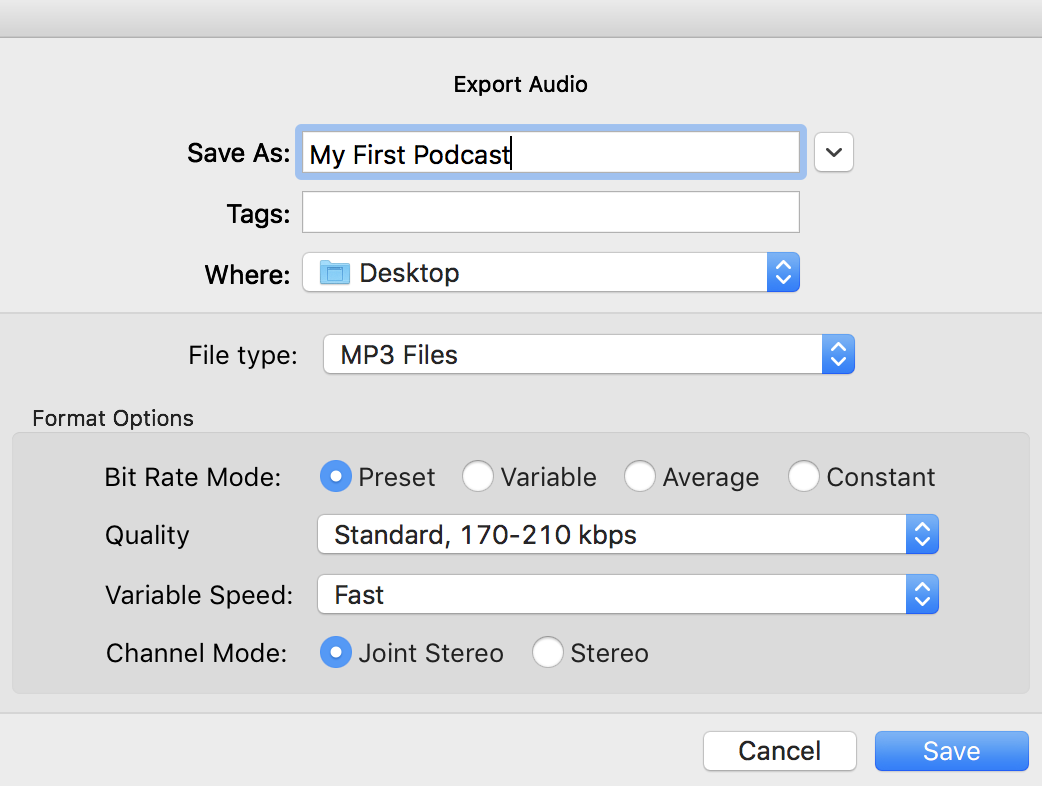
Save your audio by going to File > Export Audio. Name it, save it as an MP3 file type, and leave the rest of the settings as default.
Next up, enter your podcast’s information like artist name, track title, etc. This is stored as metadata on your file that’s used with hosting podcasting platforms like iTunes.
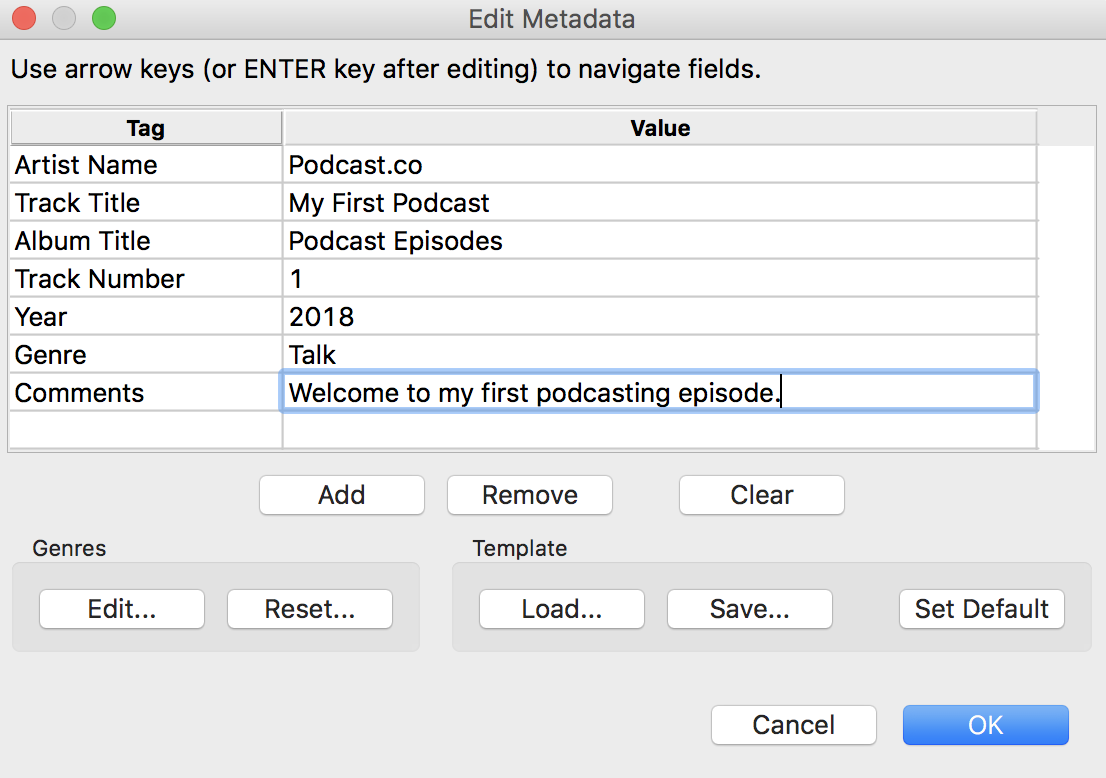
In order to export as an MP3 file, Audacity needs a decoder known as “Lame” - download it here. Finally, confirm everything to export your show. Your podcast will now be ready to upload and host online.
Editing Your Shows
Recorded audio can sometimes sound a little off. Whether that’s a distant noise in the background, dead air, or it’s too quiet/loud in parts. There’s always something to tweak to improve your show’s audio quality. Here are some different tools you can use in Audacity to make your podcasts sound a lot better.
Edit existing shows that you’ve already recorded by importing them into Audacity. Import a file by selecting File > Import > Audio.
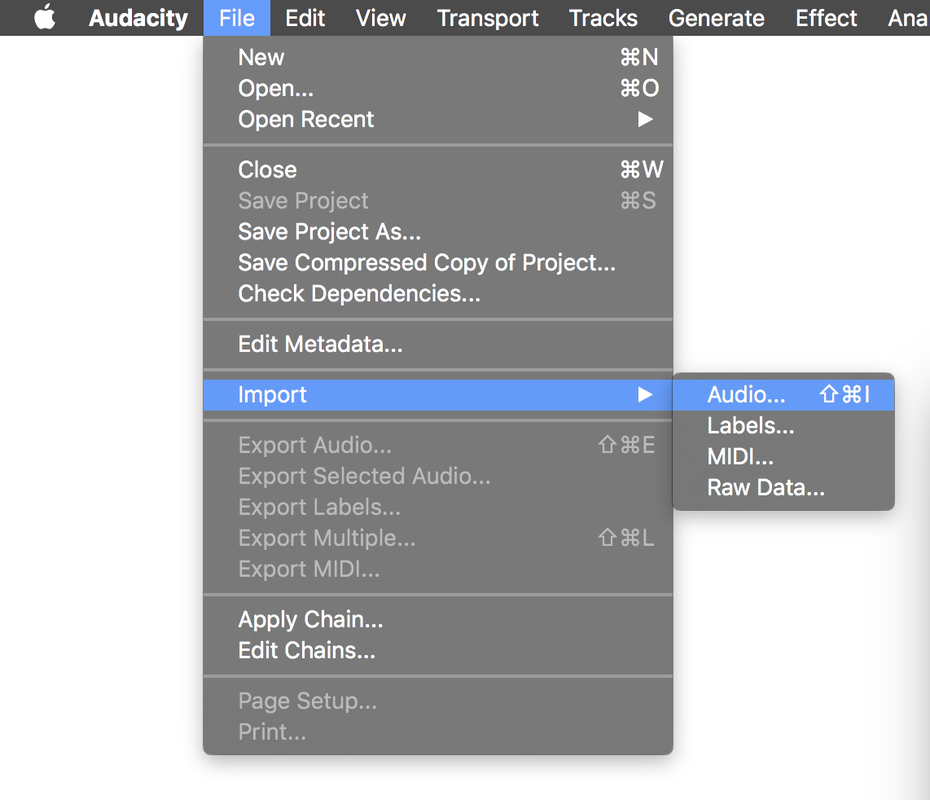
Choose the audio file you want to import by selecting it from your files. WAV and AIFF file formats are good at preserving sound quality, but MP3 is more widely accepted. Once it’s been imported the file should show it’s waveforms for both the left and right channels.
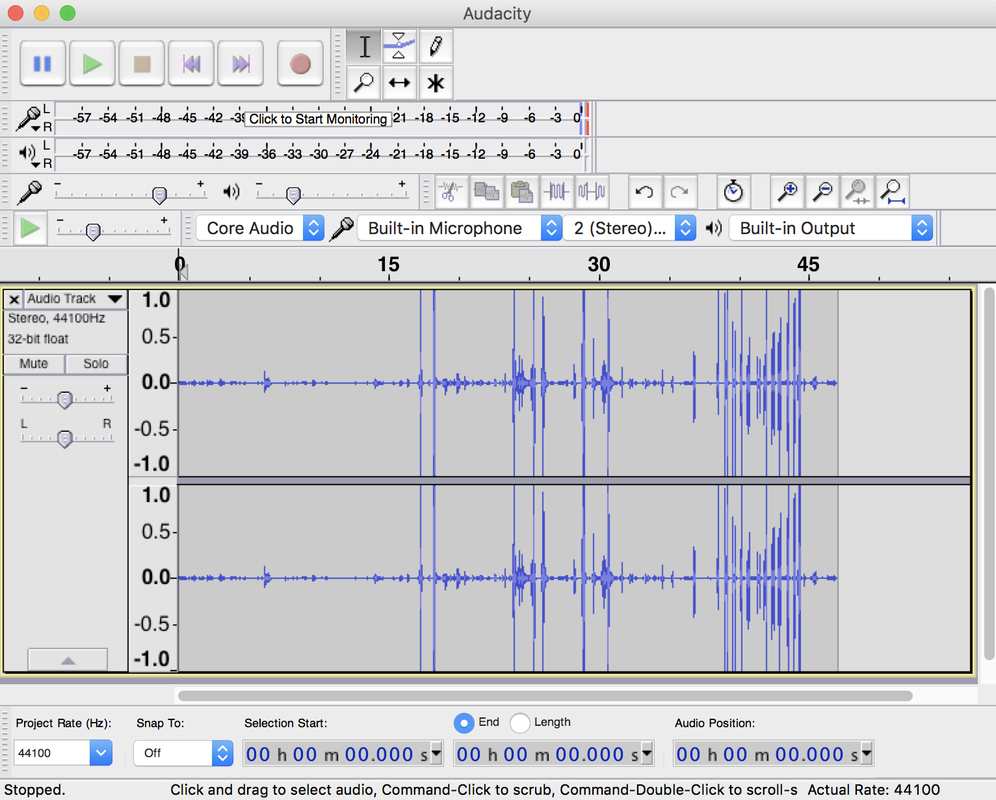
Check the file audio quality by playing the track. You should get an idea of what sounds off, things that we’ll work on now.
Cutting Audio
If your intro didn’t quite start on time or your show overran you can just cut bits out. Highlight the audio you want gone.
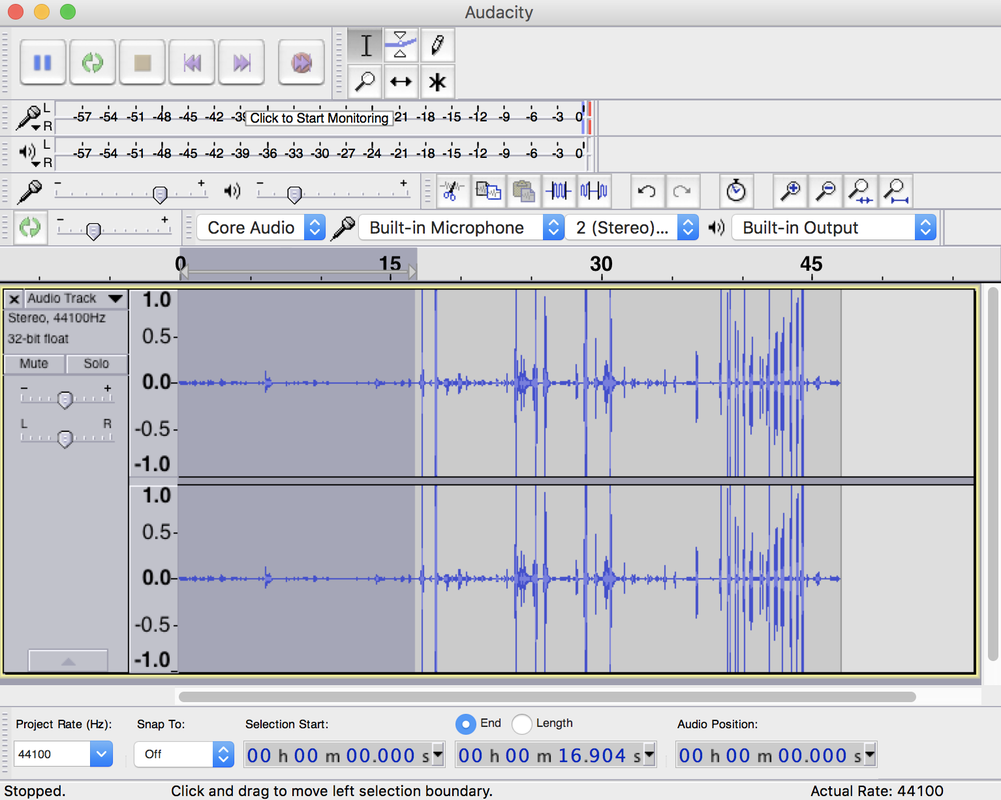
Then go to Edit > Cut. Alternatively, hit the delete key as a shortcut.
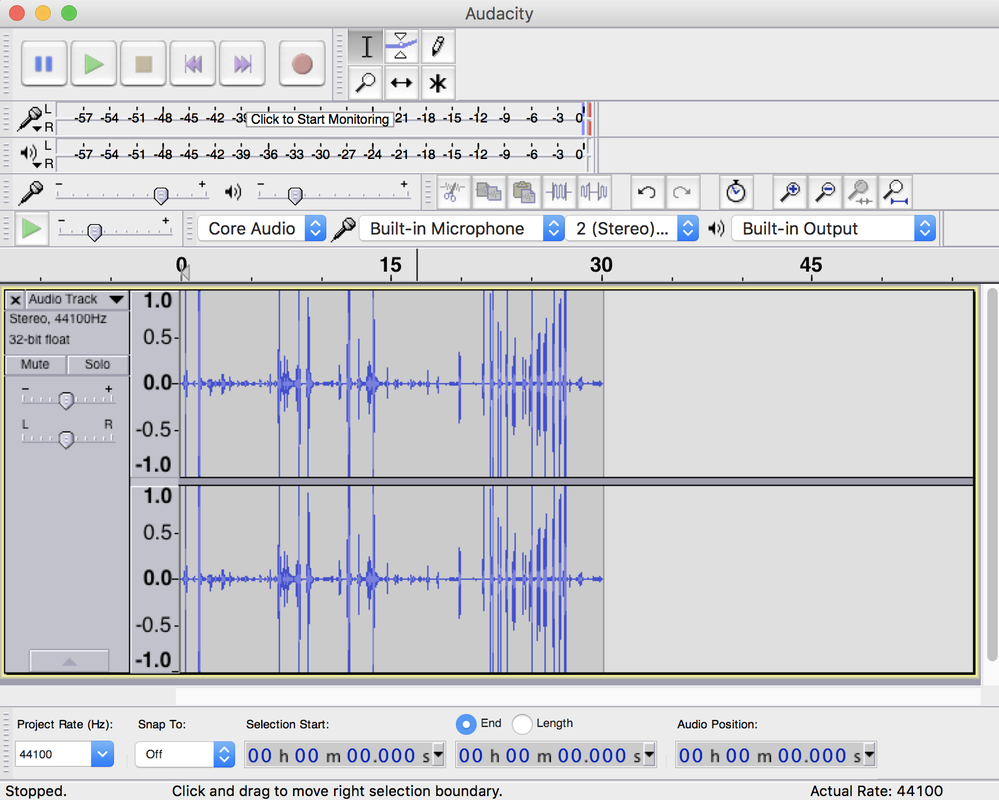
Do this throughout your show and cut any bits out you don’t want included. For 30 minute or 1 hour shows this method can be time consuming, instead use Truncate Silence.
Truncating Silence
A common problem recordings have are gaps of silence. These are common in podcasting as presenters may pause for a few seconds, but this doesn’t make for interesting listening! Cutting sections of dead air is fine for a minute’s audio, but not so much for an hour or two.
Remove all silence by highlighting your entire recording, then select Effect > Truncate Silence. To remove dead air use these settings:
- Level: -20dB
- Duration: 2
- Truncate to: 0
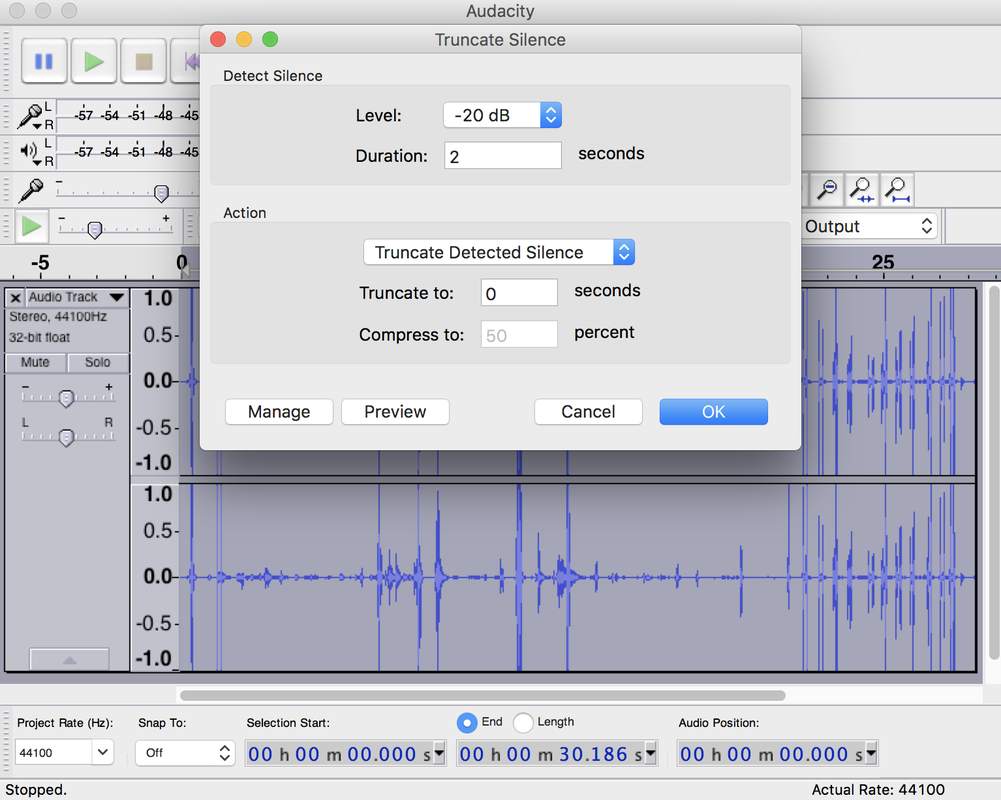
The reduction in your waveform length should be very noticeable. The settings applied completely remove any silence that’s lower than -20dB and longer than 2 seconds.
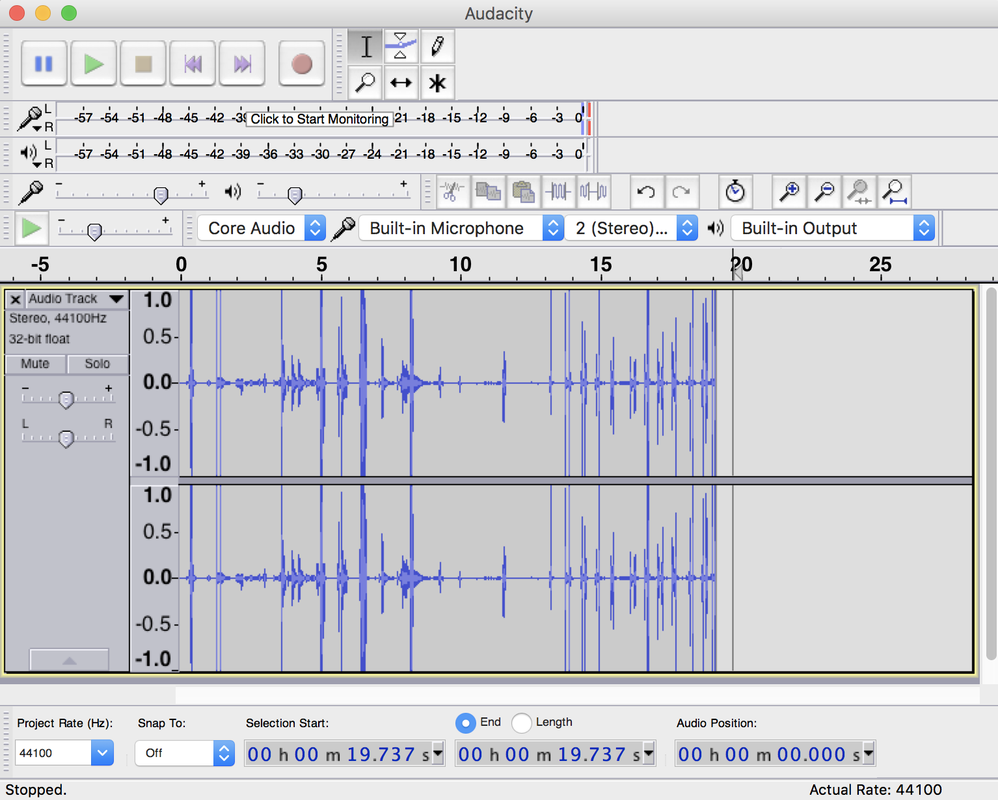
Try modifying these options and previewing the audio to see what works best for your show. Be careful though as you could cut things together to sound abrupt.
Removing Background Noises
Microphones often record far away noises and capture what’s known as “background static”, which is like a low level buzzing noise. In your waveform they’re tricky to spot, but find them by zooming in on low wave points with the + magnifying glass.
Highlight small waveforms and go to Effects > Noise Reduction, then select Get Noise Profile.
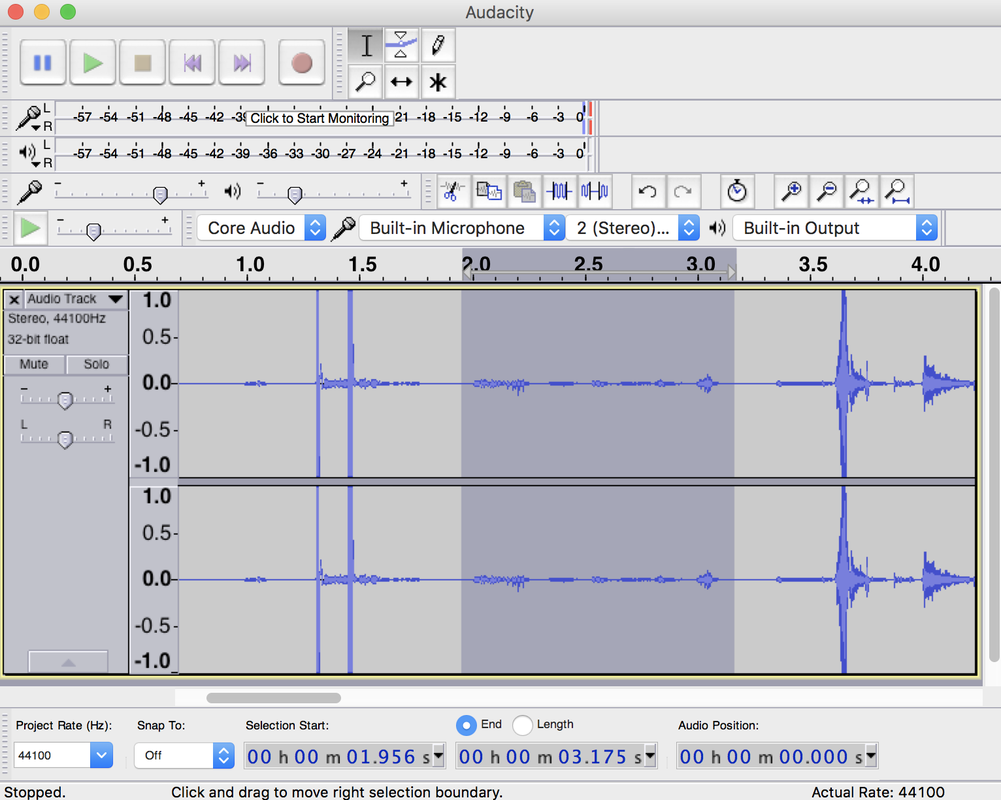
Now highlight all your audio in your waveform and go back to Noise Reduction. Adjust the settings to:
- Noise Reduction (dB): 5
- Sensitivity: 0.50
- Frequency Smooth (Bands): 1
Finally apply the changes.
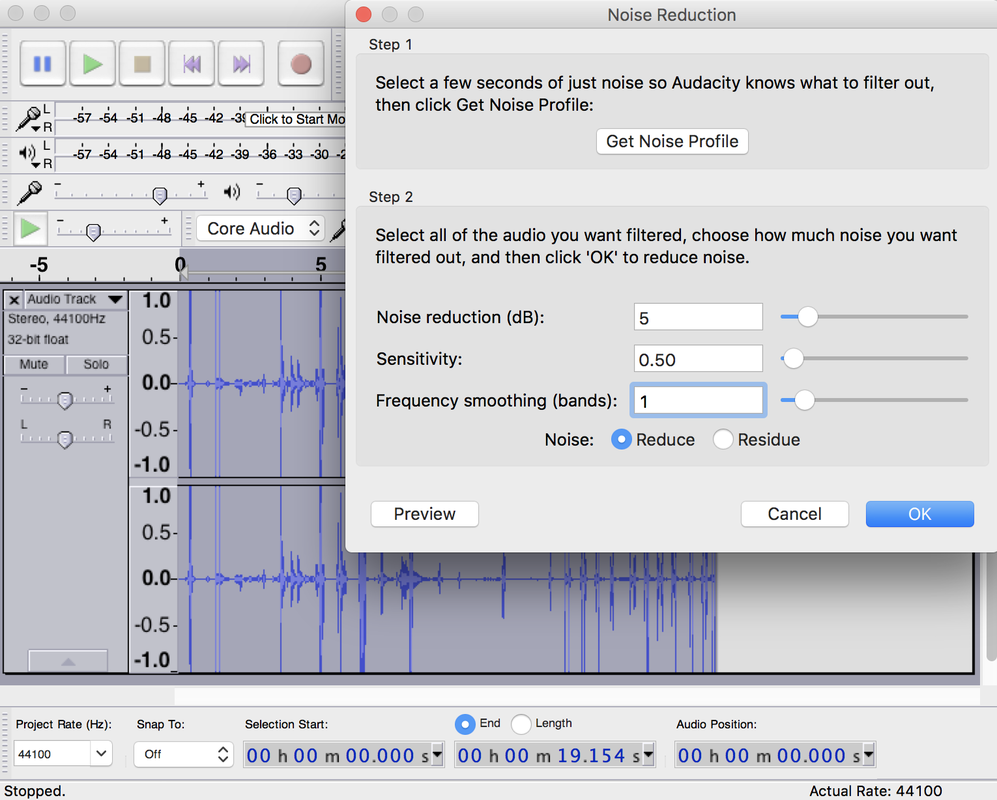
Background noises are reduced throughout your waveform, however, you may need to adjust the settings if they’re still noticeable. Make changes and preview the audio until the background noise has been reduced enough so you can barely hear it.
Fading In & Fading Out
Suddenly introducing you podcast can be rather jarring, that’s why most professional podcasters use faders. Slowly fading in to introduce your podcast gives it a more professional feel, so it’s worth bookending your podcasts with fades.
Highlight the start of your audio, usually around 5-10 seconds, then go to Effects > Fade In. Do the same for fade out. Highlight the end section of your podcast, then go to Effects > Fade Out.
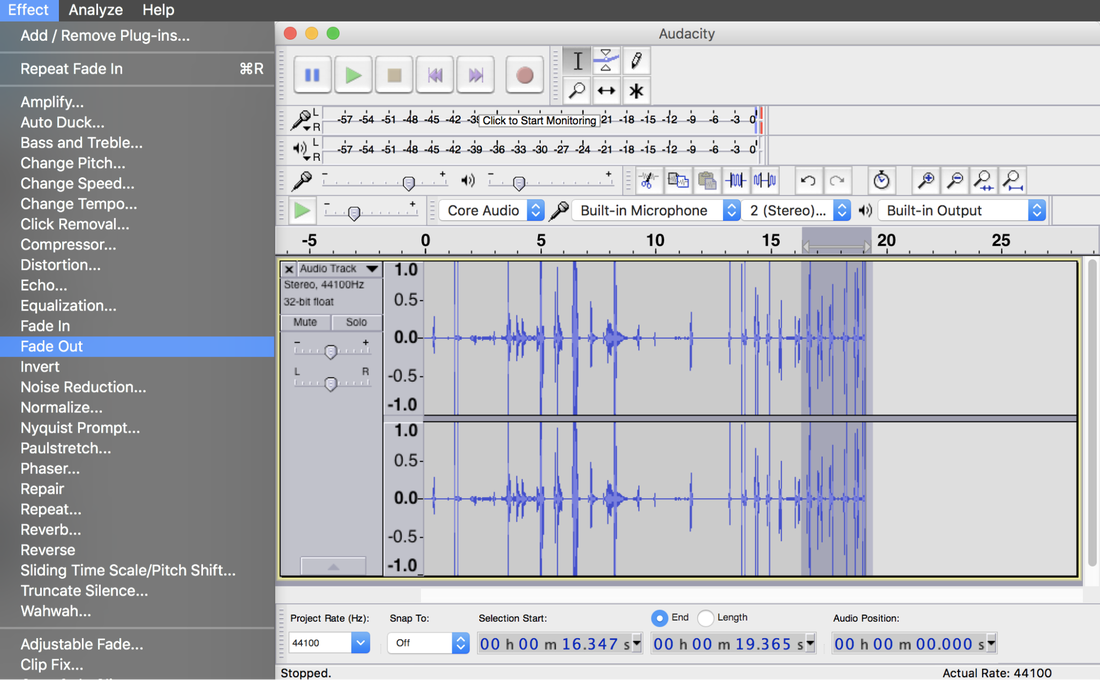
Fading in starts off quiet, gradually levelling out audio. Fading out start off normal, then slowly fades down.
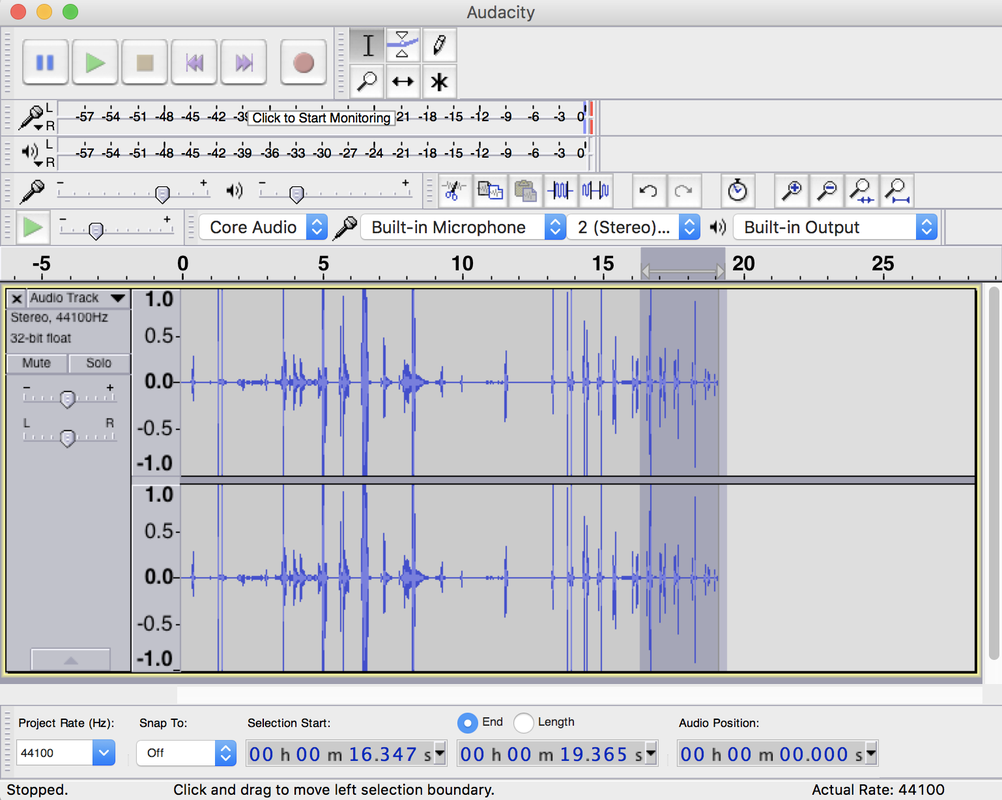
Fades should only last for a few seconds. Short fades can be a bit too abrupt. Long ones can be irritating as you can’t hear what the audio. Try and find the right balance for your show.
Amplifying and Normalizing
Audio levels that are too quiet or too loud can be balanced out using amplification and normalization.
Raise volume levels by selecting the audio you want to adjust, then go to Effects > Amplify. Adjust the slider or enter a dB number. Preview the changes to hear it back. Keep modifying the dB until it’s at a level you’re comfortable with.
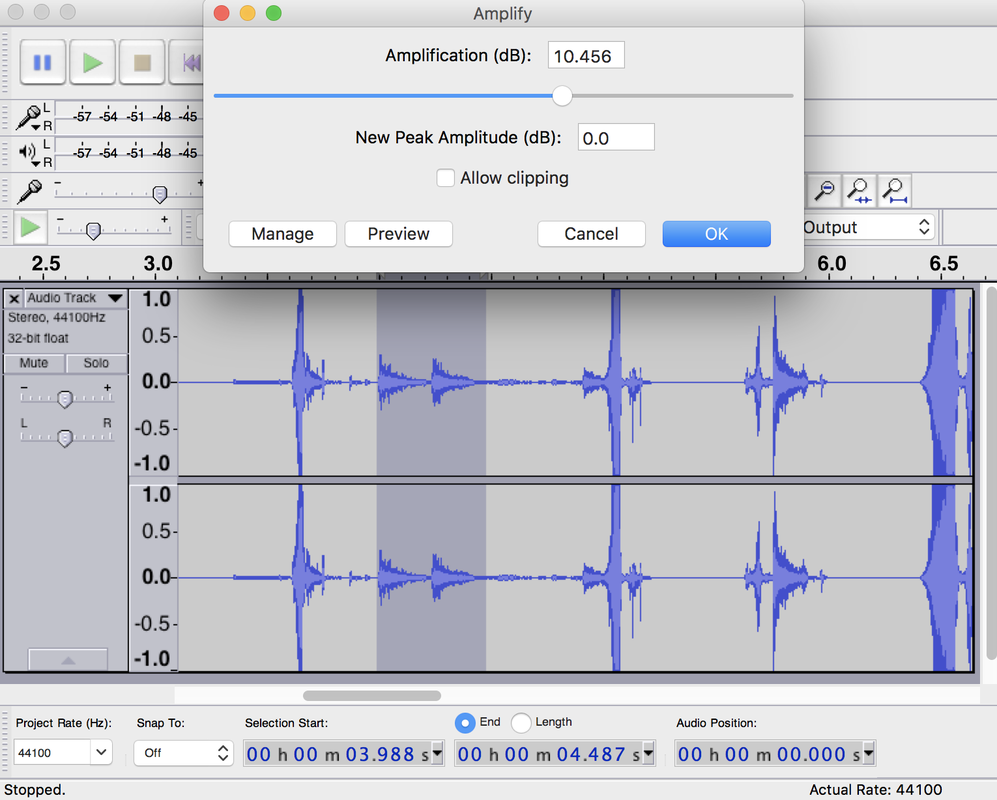
With the changes applied you should notice the waveform selected has grown bigger. Balance out the rest of your podcast so it’s at the same audio level.
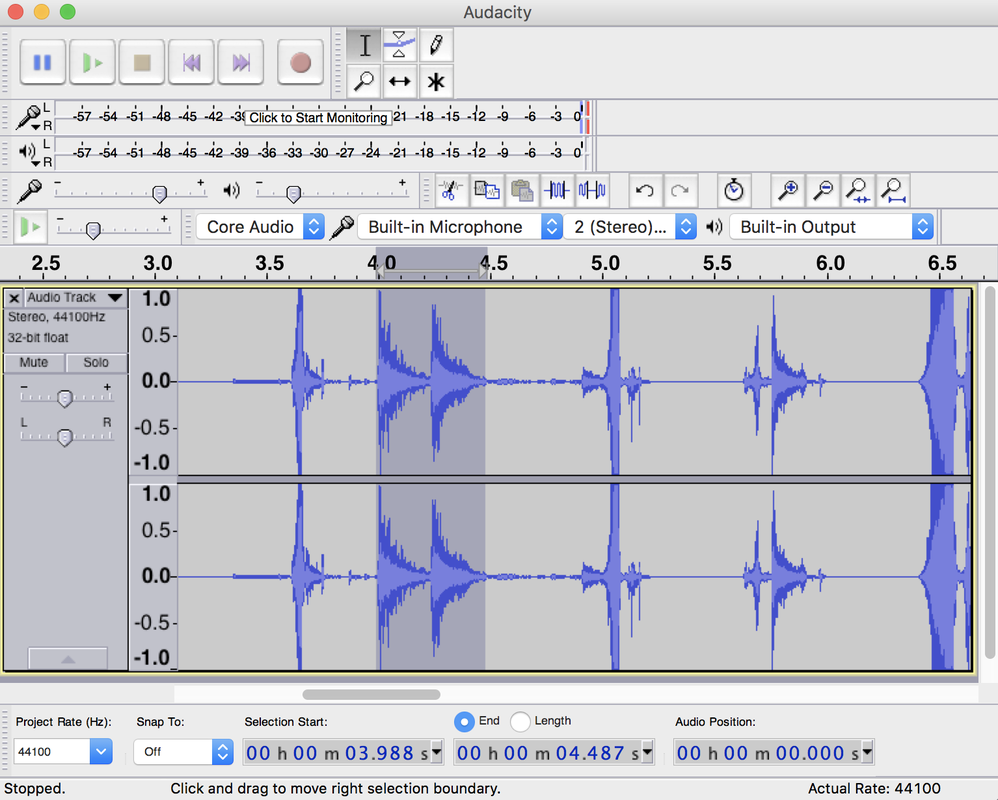
Alternatively, reduce volume levels if they’re too loud by using Effects > Normalize. You should see your waveform get smaller, meaning the volume levels have decreased.
Compressing Volume Levels
Peaking is a term used in audio production which means sound is too loud. In your waveform peaks are shown as sharp lines that go up high and suddenly drop. They often sound harsh on the ears in comparison to the rest of the audio.
Fix peaks by selecting the audio you want to alter and head to Effects > Compressor. Adjust the Threshold to -14dB and Noise Floor to -40dB.
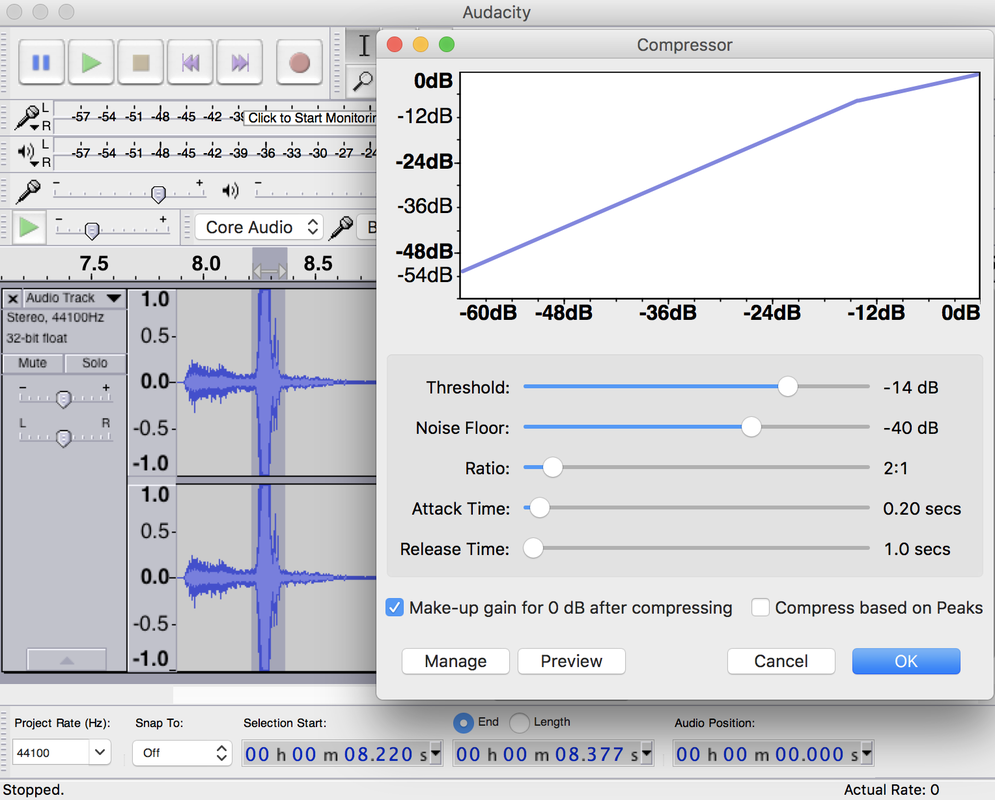
Adjust the sliders for the best results and preview the audio before applying the changes.
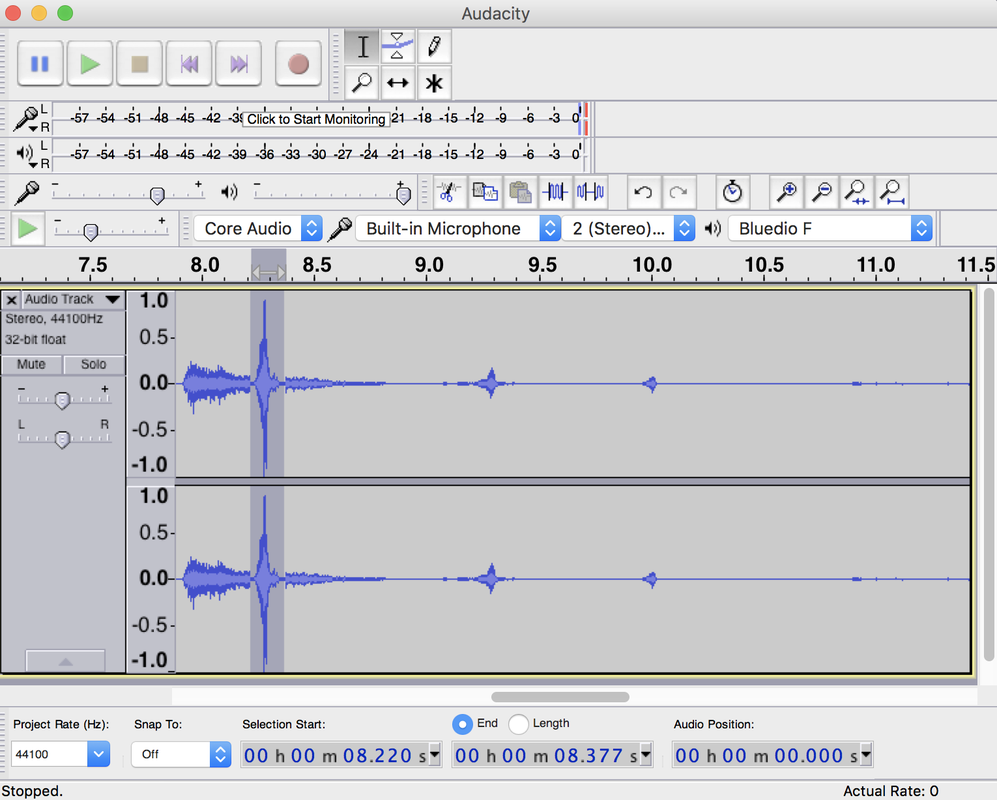
Select and compress your entire waveform if you have peaks throughout.
Removing Plosives (Harsh Popping Sounds)
Plosives are harsh sounding words that have a popping noise, usually starting with the letter P. For example, saying “Paul Prepared to Pluck Picked Peppers” close to a mic would cause plosives.
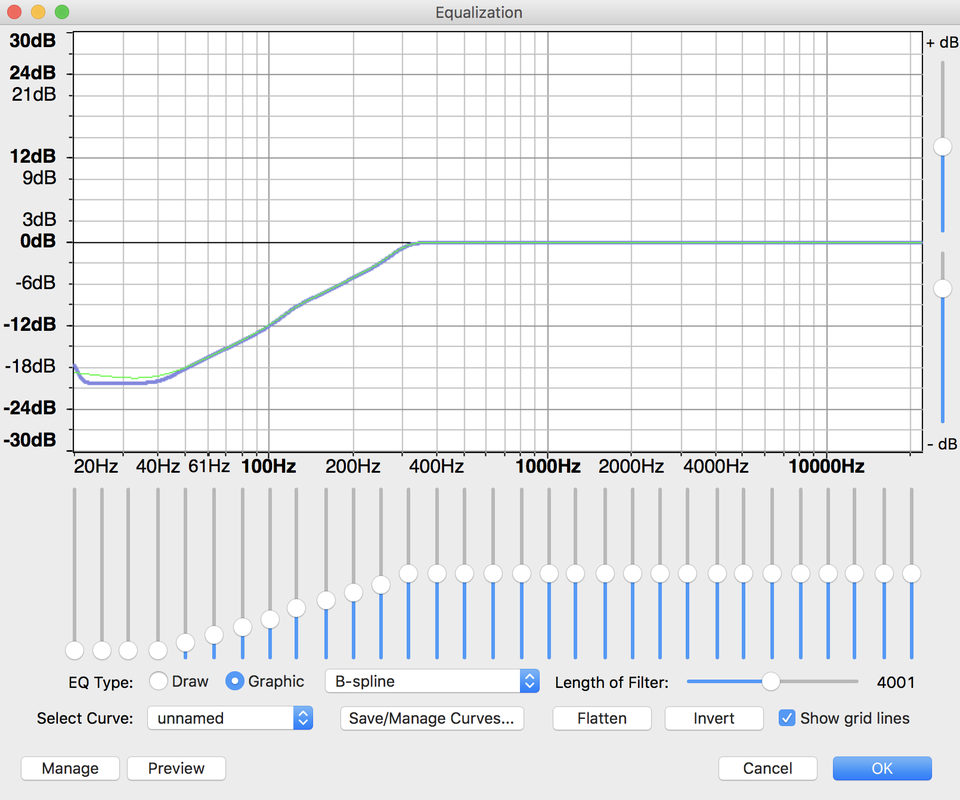
Reduce plosives by highlighting them in your waveform, then head to Effects > Equalization. Flatten the line.
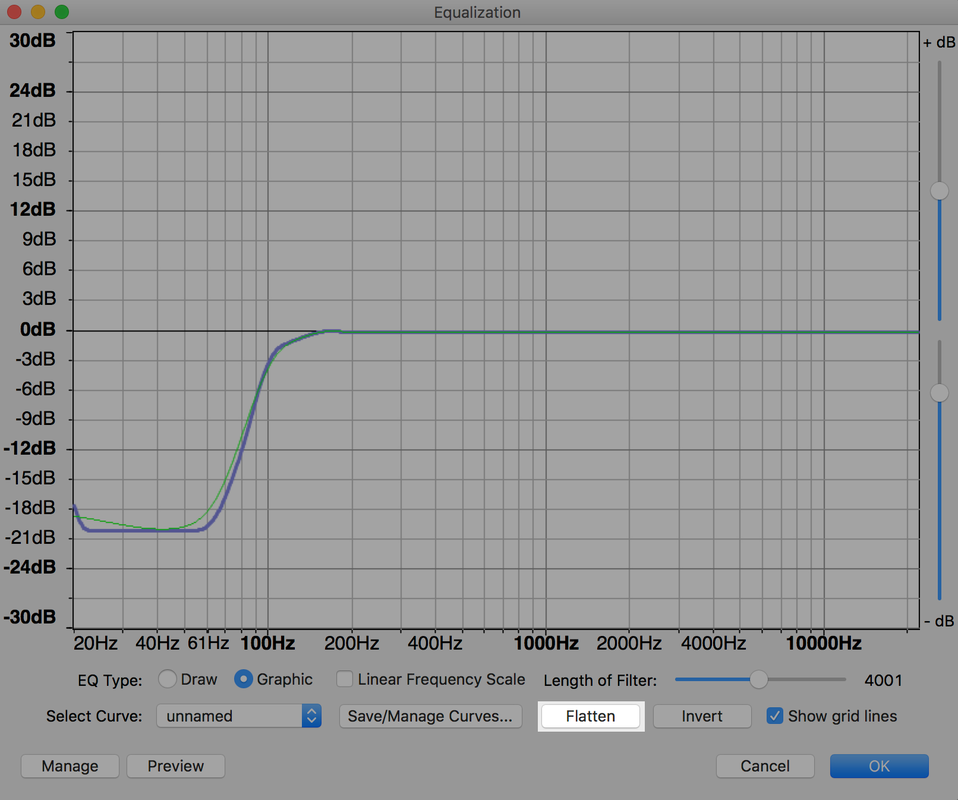
Select Graphic. Set the first 4 sliders to -20dB and next 8 go up by -2dB until just past 200Hz, then keep them as is.
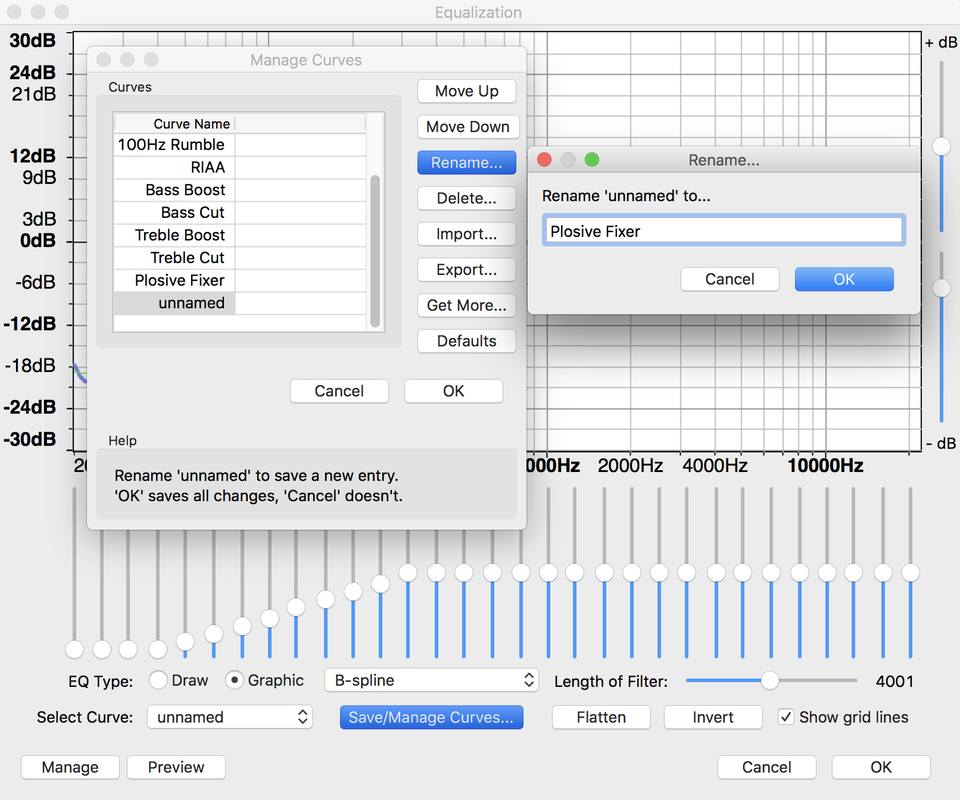
Select Save/Manage Curves to save your new configuration - name it “Plosive Fixer”.
Finally, click OK and the highlighted plosives should get fixed. Repeat this process by highlighting other sections and selecting the saved configuration in Select Curve.
Hiring Freelancers to Help Out
If you’re struggling to edit your podcasts or don’t have the time then try hiring someone to help out. Here are a few services you should check out:
- Auphonic: Audio post-production service Auphonic does everything from levelling, volume normalization, and a few other things. 2 hours of audio processing is free every month, so it’s worth a try if you do weekly podcasts.
- Fiverr: Hire freelancers for just $5 to edit your shows. There are plenty of professionals that can help out with other bits and pieces on your podcast like album artwork, promotions, and even co-hosting.
- Upwork: Just like Fiverr, Upwork is a place to find freelancers to help out with your podcast. The only difference is Fiverr is for one off gigs, whereas Upwork is geared towards long-term contracts. If you're serious about your shows then you’ll find more highly skilled professionals on Upwork.
Hosting Podcasts
Hosting your podcasts is essential to distribute your shows to directories and RSS feeds so you can get found online. iTunes is hands down the largest podcasting directory to date, so it should be your main focus. However, in order to get it on iTunes you need to host your shows elsewhere. Here are some of the best options you should check out:
- Buzzsprout: Host, promote, and track your podcasts with Buzzsprout. Integrate your shows with iTunes, Stitcher, and other podcasting directories. Upload up to 2 hours of podcasts for 90 days for free or pay a small fee to host indefinitely.
- Podbean: An all-in-one podcasting solution, Podbean offers pretty much everything you need to get going. Use their mobile app to manage podcasts on wherever you are and host shows on your own website. Pricing starts at $3/m with the essentials you need to get started.
- SoundCloud: Primarily targeted towards musicians, SoundCloud can be an excellent place to host your podcasts due to it’s large community, which means more opportunities to grow your listeners. For example, Snap Judgment has over 200,000 followers. There’s lesser known shows like Thought For Food Podcast with around 500 followers.
- Libsyn: One of the longest running podcasting services, Libsyn has been around since 2004. Known for being reliable, they are one of the most trusted providers having hosted shows for the BBC and has over 1.6 billion active monthly listeners. Pricing starts at $5/m that includes an RSS feed, podcast page, and app listing for distribution and audience growth.
- Mixcloud: Home to some of the most downloaded podcasts like The Guardian, StuffYouShouldKnow, and The Joe Rogan Experience. As the name suggest, Mixcloud is a mixed bag of music, radio shows, and podcasts. This diverse community has over 1 million uploaders and attracts 17 million monthly active users, so there’s plenty of opportunities to get your shows heard.
Syndicating Your Podcast RSS Feed
Syndication is a way to get your podcasts heard by more listeners. Hosting platforms like Buzzsprout offer RSS feeds for syndication. They’re links used with podcasting directories like iTunes so listeners can access your shows. Here’s how it works:
- Upload your podcast to a hosting platform like Buzzsprout, SoundCloud, or Podbean.
- Submit your RSS feed (provided by the hosting platform) to podcast directories such as iTunes.
- Every time a new podcast is uploaded to your hosting platform, the RSS feed gets updated and the directory will reference the new episode.
Subscribers on places like iTunes will automatically get notified and download the latest ep to their device.
Publishing Your Podcast to iTunes
So how exactly do you get listed on directories like iTunes? Each can be a little different in terms of what you need to submit, but for iTunes you need the following:
- Artwork: 1400px x 1400px (min) and 3000px x 3000px (max) in size and JPG or PNG file format.
- Name: Unique podcast name that hasn’t already been taken (check iTunes).
- Category: At least 1 category selected.
- Email: Valid email address to verify and receive updates from iTunes.
- Hosting: Have your podcast hosted and accessible in either MP3 or M4A file format.
To submit your podcast you need an Apple ID. If you don’t have one then create an account here. Next, follow the steps below:
- Sign in to iTunes Podcast Connect.
- Click the + at the top left of the dashboard.
- Enter your RSS feed into the provided text box and click Validate.
- A preview will load to check for validation errors. Review your details like artwork and description to make sure they’re correct.
- Finally, click Submit to send it off to Apple for review.
All podcasts submitted to iTunes are moderated. It can take up to 10 days to get approved. Apple will send you a confirmation email on success with an iTunes subscribe URL. Use this on your website to grow your listeners.
Growing Your Listeners
Now that your podcast is out there for all to see, what’s next? Listeners won’t tune into your shows if they don’t know who you are, so you need to lay some bread crumbs down.
Making Money from Podcasting
Making money from your podcasts isn’t easy. It takes hard work and dedication to generate any kind of income from your shows. However, the upside is there are plenty of ways you can go about making money. Your main focus should be building up your audience and their trust. People aren’t going to buy things from you if they don’t feel comfortable. Offer them value first by releasing regular podcasts and running giveaways.
At Podcast.co we've kept things simple so you can earn whilst you podcast. Using Patreon and PayPal, you can now accept donations for your podcast. Monetise your shows and turn your passion into a profitable business.
Building Your Reputation
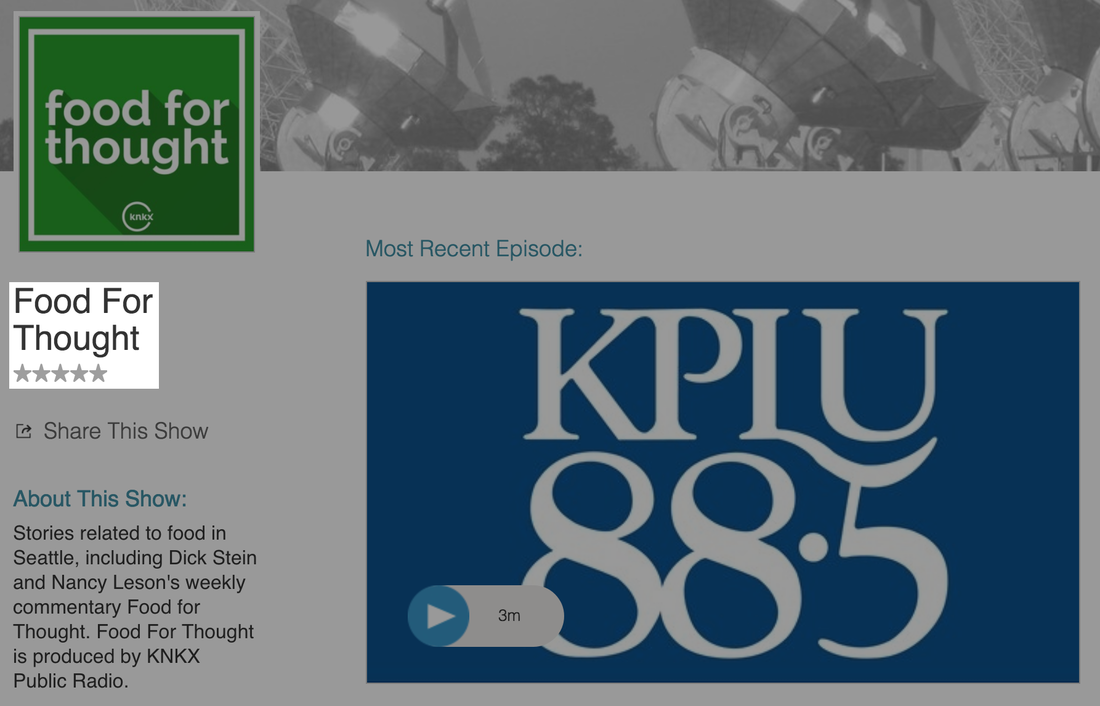
What puts most newcomers off tuning into your podcast is reputation. Having lots of subscribers and reviews can help you build momentum to grow your audience. No reviews is just as bad as having negative reviews. For example, would you rather listen to this podcast with no reviews?
Or would you rather listen to this podcast focusing on a similar topic with lots of positive reviews?
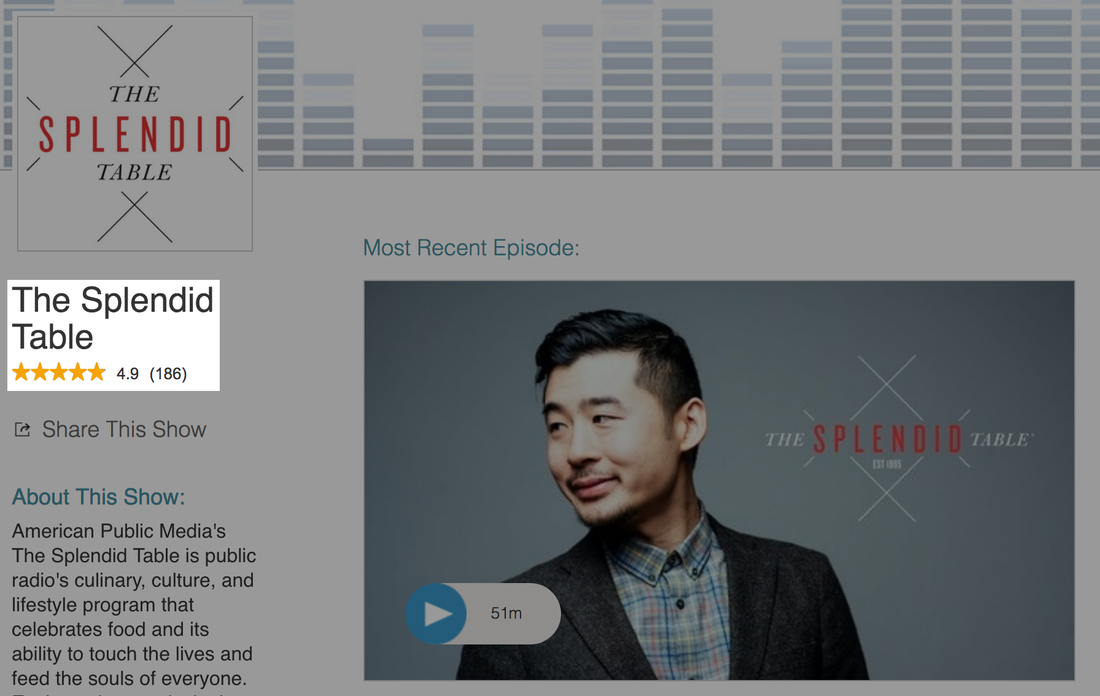
A strong reputation like this is a major deciding factor when it comes to tuning into your shows. Ask your current listeners to leave a review, rate your show, and subscribe to your podcast to build up your reputation. Even if it’s just friends and family to start off with, every little helps.
Try adding call to actions at the end of every episode to encourage reviews and get listeners subscribing. Do this elsewhere like your website by embedding subscribe buttons. Most people might not be at a computer or able to leave a review, so remind them to take action on places like Twitter and Facebook.
Strategy to try… Reward listeners that leave reviews. Read a random review during your show and give a free Kindle book to the listener. Listeners then have more incentive to leave a review since there’s something in it for them.
Releasing Consistent Content
An important part of growing your listeners is being consistent. Nobody wants to follow a podcast that promises to put out regular content, but doesn’t follow through. It’s like missing your favourite TV show because it was played on a different day.
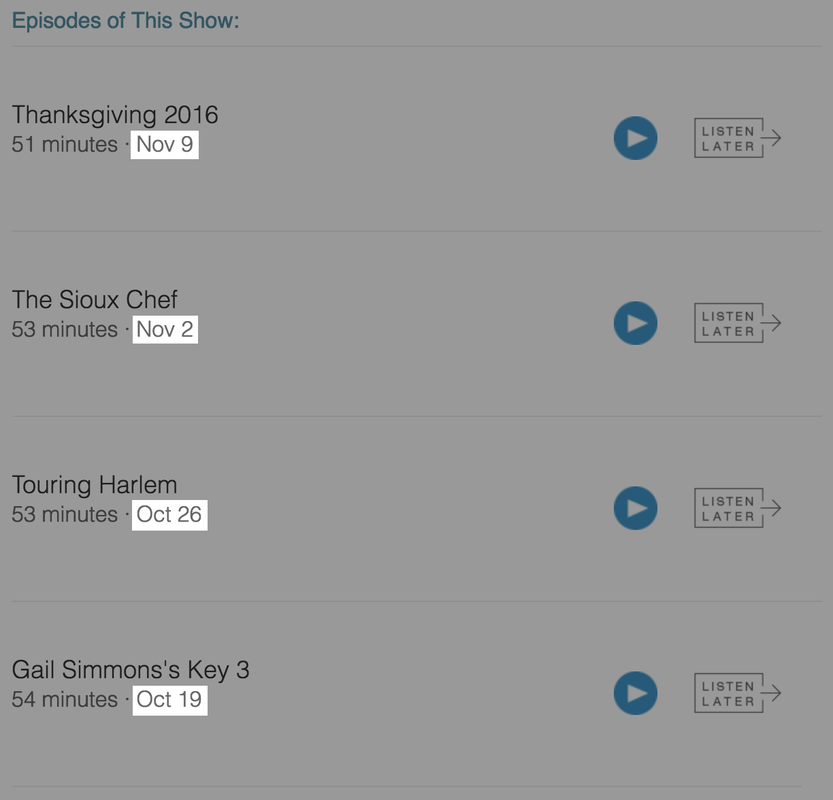
If you plan on releasing new episodes each week, do it on the same day and at the same time so listeners know when to expect it. For example, The Splendid Table releases weekly episodes every Thursday:
As you’re just starting out it’s best to launch with 3 episodes. Listeners get a sampling of what your shows are all about and you get 3 times more potential for downloads. Plus, the first episode is usually an introduction to your show and why listeners should stick with you.
Inviting Well-Known Guests
Find interesting guests that can drive traffic to your podcast. Well known people within your industry already have an audience, so filter that traffic to your shows.If you focus on food then try and get a well-known chef like Gordon Ramsay.
If your show is about politics then try and get a local representative to talk with you. For example, WTF with Marc Maron had Barack Obama on his show.
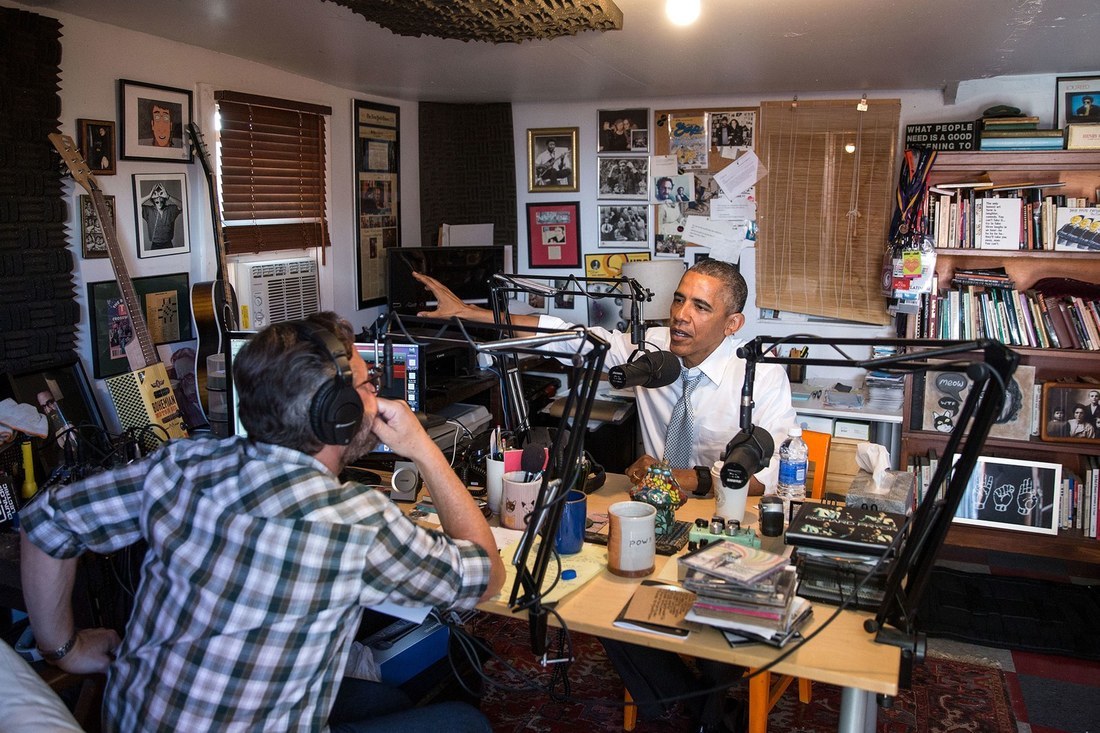
The show was featured in The New Yorker, The Atlantic, and even spawned it’s own website: Marc Meets Obama. Since it aired, the show has attracted an additional 200,000 to 300,000 downloads per episode.
The point is, well known guests help boost your listener numbers. Even if it’s just a short spike of extra downloads per month, it all adds up to building your reputation.
Building Mailing Lists
Email is one of the best ways to get in touch with your listeners. It’s even more effective than your podcast or social media channels. People are more likely to check their emails and take action.
Got a new show coming out? Email your listeners. Is a special guest appearing on your latest episode? Email your listeners. Got some fresh merchandise you want to sell? Email your listeners.
Build up your mailing lists by encouraging listeners to sign up. Tell them if they head to your website and enter their details then they can stay informed about new content. Alternatively, if you don’t have a website then encourage listeners to subscribe.
Getting Sponsored
One of the best ways to make money is by getting sponsored. Promote product or services during your shows.
If you’ve ever listened to popular podcasts like Reveal or Making Oprah, then you’ve probably heard an advert from a sponsor. Normally, the host reads an ad and directs listeners to a specific link at different points in the show. Listeners are most engaged at the start and midway through a show, so they’re more likely to act or remember what you mention.
Another way is to use your shows to promote your own products or services. Much like sponsored content, you can direct listeners to specific places during your shows. Track who actually clicks on these links by using unique URLs or discount codes, that way you know what’s working.


